
Step by Step – a Facebook Custom Audience Guide
About the Author: Uri Bishansky
Find me on:
Introduction – Facebook Custom Audience Guide
Custom audiences is one of Facebooks most powerful tools. The ability to use your own data whether it is from your website, mobile app, CRM or even Facebook engagement grants you a lot of power can drastically increase your overall digital performance.
With great power comes great responsibility – segmenting these custom audiences is completely in your hands – doing it wrong can lead you to miss on many opportunities out there.
This Facebook custom audience guide will walk through all the steps in the process.
The Custom Audiences Inventory
Facebooks custom audiences are divided in to 4 different segments:
- Website Custom Audiences (WCA)
These audiences are defined by their online behavior at your website. Different sets of rules can be set, whether according to pages they visited or action performed.
If you have a Facebook pixel installed on your website, the data will be harvested from it. If you’ve been in a coma and don’t yet have a pixel installed, you can find instructions on how to install a Facebook pixel in our upcoming guide. - Customer Lists
By uploading your own data from your CRM (emails or phone numbers) Facebook can pin-point an average of 48% of them enabling you to directly target your own customers or prospects.
- App Activity
These audiences are defined by their online behavior on your App. Different sets of rules can be set whether it is screen views or actions performed. Harvesting this data is accomplished by implementing Facebook SDK for Mobile apps.
- Facebook Engagement
These audiences are defined by their engagement with your videos on Facebook.
Creating Custom Audiences
Begin by selecting the Audiences Tab in your Business Manager or Ads Manager as follows:

After selecting the Audience tab you will hit the main audiences screen as follows:

- Create Audience – this button opens a dropdown list of audience types – Custom Audience, Lookalike audience, Save audience
- Name Column – this column describes the name you gave the custom audience
- Type Column – this column describes the type of the available audiences
- Size – Audience size
- Availability – indicates whether the audience is ready for use and when it was last updated
Clicking on the Create Audience button will open the following screen:

Click on the Custom Audience button to proceed and open the Custom Audience Selection.

Customer List Audience
Clicking on the Customer list button will open the following screen:

Uploading a file
upload a CSV file of your contact’s email addresses or phone numbers. No point in trying to upload Facebook user IDs as this option has been blocked after some advertisers mined this information illegally (thanks guys).
Once selecting the upload file option the following screen will appear:
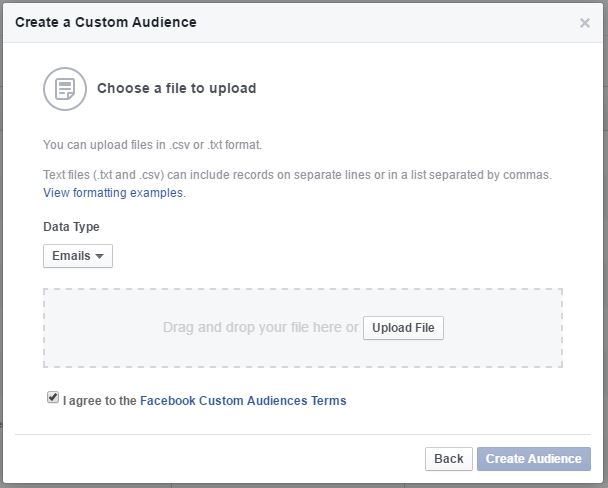
Choose the data type you want to upload (Emails, Phone Numbers, App users, Mobile Advertisers IDs).
Click the Upload file,
Read and agree to their terms (or don’t)
and – create your audience.
Copy and Paste your Customer List
Choosing this option will open the following screen:

Same as before, select the data type, only this time paste your data in the text box and create your audience.
Import from mailchimp
This option will enable you to login to your Mailchimp account and integrate it with Facebook’s custom audiences.
Website Traffic Custom Audiences (WCA)
This is where the true magic happens for website advertisers. As disussed these audiences are defined by their online behavior at your website.
Clicking on this option will open the following screen:

Pixel – Select the pixel you want to harvest the data from
Website traffic – a dropdown menu that offers a few segmenting options as described below
In the last – Timeframe which you want to select from
Anyone who visits your website
This is the most basic custom audience you can create. One list of all the website visitors with no segmentation at all. The screen will look like this:

Just select the time frame you want and check the “include past website traffic” box. Give your audience a name that’s easy to remember like: “All Visitors” and you are ready to go.
People who visit specific web pages
This is a bit pickier, you can select people that visited specific web pages, that will look like this:

You can select whether the URL contains the keywords you place, or to select Exact URL.
Choose a timeframe, name your audience and you are good to go.
People who visit specific pages but not others
This option allows you to segment users by selecting webpages that they have visited and exclusing webpages that they hadn’t visited. The screen will look like this:
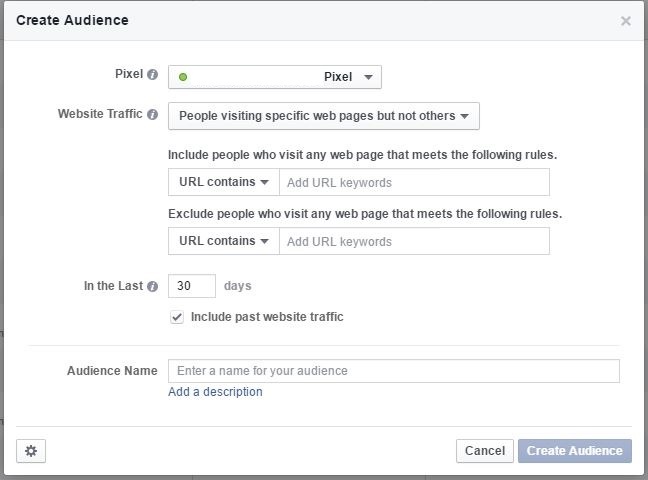
Select users that visited pages in your website then select the pages you want to exclude people who visited them from your list. For example – you can select people who visited your blog and hadn’t been on a thank you page. This way you can create a remarketing list of people who read your blog but hadn’t subscribed yet. Great for list building!
People who hadn’t visited your website in a certain amount of time
This option creates a list of all the users that had been on your website for the past 180 days. Then you can select the lookback window you want to exclude people from. For example:
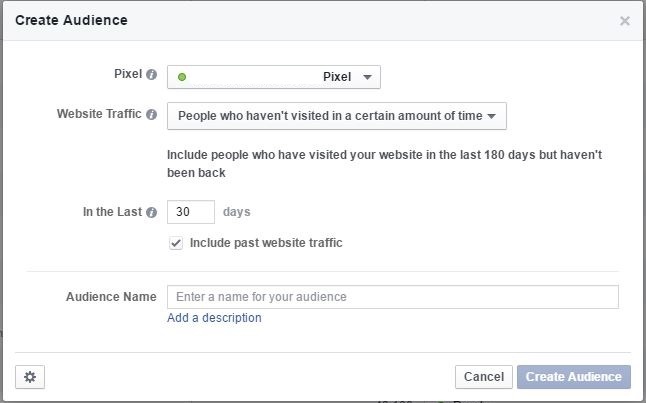
You can create a list of all your website visitors that hadn’t been back on your website the past 30 days.
The screen will look like this:
Custom Combination
This option allows you the full bandwidth of customizations, using AND/OR and exclusions giving you complete flexibility in creation of custom audiences.
The screen will look like this:

- Include traffic that meets your required definitions.
Under this section, you can select all the rules that you want to apply on the audience you want to target. Each row has a logical conjunction of OR between the parameters in it, and a logical conjunction of AND between the rows.
This simplified Venn Diagram makes life easier by depicting the logic behind AND/OR logical conjunctions:

The red area in the diagram is the result of A AND B. The entire surface is declared by A OR B.
- Include more or Exclude people
This allows you to add additional inclusive rows. Or the ability to exclude traffic that meets certain rules. For example – target a list of all the traffic that added an item to cart and also added a payment method but did not complete the purchase. - Visited website on: this enables you to differentiate between desktop/mobile traffic and to create a different list for each device type.
All that’s left is to name your audience and you are ready to go.
App Activity based Custom Audiences
This custom audience type allows you to create audiences based on their app activity. Tracking app activity and monitoring in Facebooks advertising products requires to install Facebooks SDK in the App or to use a 3rd party Facebooks approved tracking system such as Appsflyer.
Segmenting these audiences is less flexible than website custom audiences and allows you to select triggering events and exclude events. The screen will look like this:

Choose the name of your audience, select the app you want to harvest data from.
Select whether you want to select by actions taken/actions not taken or custom (action that have been taken and actions that hadn’t been taken).
Click create audience and you are ready to go.
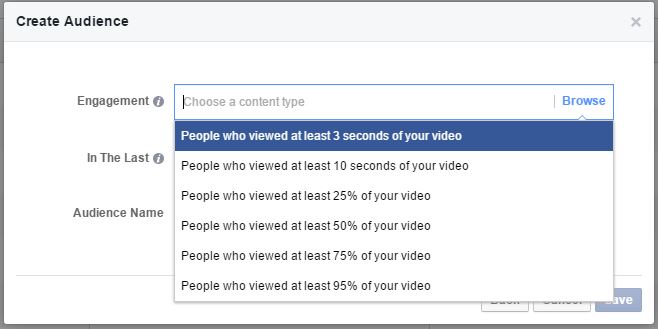
Facebook Engagement Based custom audiences
This enables you to segment audiences based on their Facebook engagement with your videos (probably more segmentation options from other engagement signals will come soon).
This segmentation method is quite simple – you choose a video and the type of engagement you want. Here’s a screenshot of all options:
Lookalike Audiences
Facebook has a unique marketing tool called Lookalike Audiences.
This tools enables you to find more people on Facebook that are similar to your current audiences.
Using this tool enables you to expand your reach but to keep your targeting as sharp as a knife.
The lookalike audience algorithm uses over 1000 different signals to find the closest audiences to your customers.
Seed Audience – the audience base that you allow Facebook to create the lookalike audience upon.
Selecting your seed audience is one of the most important aspects of lookalike audiences. When selected correctly it creates a quality lookalike audience, failure to do it right causes the lookalike audience to be less relevant then the standard Facebook targeting.
How to choose a Seed Audience
in order to create a solid seed audience you will need to isolate the factor that causes your ideal customers to be the ideal customers. For example: users that spend more money on your website or generate more page views (for publishers).
the minimum seed audience size that is required to create a lookalike is 100 users from the same country. The best practice is not to select a seed audience that is less then 1000 users from the same country. The bigger the target country is the bigger the seed audience should be.
Pro Tip: Try to find the tipping point where users start to become really good for you. Adapt the Principle and aim to find the 20% audience that generates 80% of the revenue and aim to use this audience as the seed audience for your lookalike
Once creating the lookalike audience you can select the output audience size from the closest 1st percentile of the target country to the 10th percentile.
For example – Lookalike 1% will create an audience the size of 1% of the target country which will contain the closest 1% people from the target country to your seed audience
Creating a lookalike audience
On the audiences screen click on the create audience button and choose Lookalike Audience as seen in the screenshot below

After clicking it the lookalike audience create screen will open and it looks like this:

Source: choose the Custom Audience or conversion tracking pixel which you want to create the audience from (Seed audience)
Country: choose the target country for the lookalike. Remember that the minimum seed audience size required is 100 (1000 recommended)
Number of audiences: Choose the amount of segmented audiences you want to create from 1-6
Audience Size: depending on the amount of audiences you selected you will have on this field a corresponding number of circles to define a starting and ending point of each audience.
Fill in all the details, click confirm and your audience will be cooking (it could take up to a few hours for the audience the be created)
Audience Overlapping
Managing multiple audiences, campaigns and adsets could result an audience overlapping.
An audience overlapping is a situation where 2 or more audiences has an amount of audience that consists at both lists (or more).
This situation causes you to target the same people from two different adsets/campaigns. The common mistake is to think that you are competing against yourself. The real issue is that Facebooks algorithms causes under-delivery when you double target an audience.
An under-delivery state is that the campaign can’t manage to finish the daily budget or in extreme cases doesn’t create any impressions at all.
In order to make sure that you are not targeting overlapping audiences Facebook recently created a tool that calculates the overlapping between audiences
To check the audience overlapping select 2 or more audiences in the Audiences screen and click Action-audience Overlapping as seen on the following screenshot
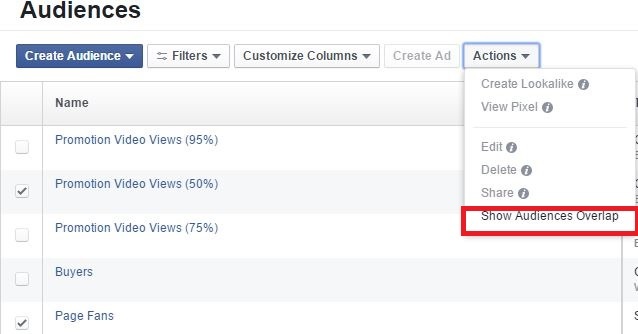
Clicking on the button opens the next self-explanatory screenshot

Conclusion – Facebook Custom Audience Guide
Smartly using the Facebooks custom audiences gives you the ability to harness the power of your data. Using it reduces the costs per acquisition and increases the total amount of actions you achieve.
Try to make as much more segmentations you can and test the different audiences. The data on the engagement from audiences can give you greater insight on how to optimize your campaigns and marketing funnels even more.
If you are using Facebook as an advertising platform you must know the variety of different ads, posts and images that you can use on Facebook. Download our Facebook image size cheat sheet to get a hold of the complete images size list for Facebook.
Uri Bishansky
Uri is the co-author of the Amazon no.1 Bestseller "The Smart Marketer's Guide to Google AdWords". He has been programming since he can remember himself. He lives by excels and numbers, rides bikes, loves dogs and a keen self-educator. Uri has a degree in finance and has been a google partner since 2013.
SHARE THIS STORY
Uri is the co-author of the Amazon no.1 Bestseller "The Smart Marketer's Guide to Google AdWords". He has been programming since he can remember himself. He lives by excels and numbers, rides bikes, loves dogs and a keen self-educator. Uri has a degree in finance and has been a google partner since 2013.


Uri Bishansky
Uri is the co-author of the Amazon no.1 Bestseller "The Smart Marketer's Guide to Google AdWords". He has been programming since he can remember himself. He lives by excels and numbers, rides bikes, loves dogs and a keen self-educator. Uri has a degree in finance and has been a google partner since 2013.


